
1.6 Bài tập và thực hành
Bài
tập 1a. Viết lại các đoạn mã trong phần lý thuyết.
Bài tập 1b. Đây là tài liệu HTML trong
tập tin có tên cooking.html. Bạn có thể lấy bất kỳ hình ảnh nào để thay
thế cho salads.jpg (với kích thước 300 x 200px).
[cooking.html]
<!doctype html>
<html>
<head>
<meta charset="UTF-8">
<title>Cooking with Nada Surf</title>
<style>
</style>
</head>
<body>
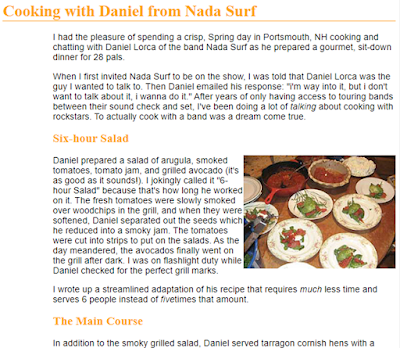
<h1>Cooking with Daniel from Nada
Surf</h1>
<p>I had the pleasure of spending
a crisp, Spring day in Portsmouth, NH cooking and chatting with Daniel Lorca of
the band Nada Surf as he prepared a gourmet, sit-down dinner for 28
pals.</p>
<p>When I first invited Nada Surf
to be on the show, I was told that Daniel Lorca was the guy I wanted to talk
to. Then Daniel emailed his response: "I'm way into it, but I don't want
to talk about it, I wanna do it." After years of only having access to
touring bands between their sound check and set, I've been doing a lot of
<em>talking</em> about cooking with rockstars. To actually cook
with a band was a dream come true.</p>
<h2>Six-hour Salad</h2>
<p><img
src="salads.jpg" alt="Smoked tomato salads on
plates"></p>
<p>Daniel prepared a salad of
arugula, smoked tomatoes, tomato jam, and grilled avocado (it's as good as it
sounds!). I jokingly called it "6-hour Salad" because that's how long
he worked on it. The fresh tomatoes were slowly smoked over woodchips in the
grill, and when they were softened, Daniel separated out the seeds which he
reduced into a smoky jam. The tomatoes were cut into strips to put on the
salads. As the day meandered, the avocados finally went on the grill after
dark. I was on flashlight duty while Daniel checked for the perfect grill marks.</p>
<p>I wrote up a streamlined
adaptation of his recipe that requires <em>much</em> less time and
serves 6 people instead of <em>five</em>times that
amount.</p>
<h2>The Main Course</h2>
<p>In addition to the smoky
grilled salad, Daniel served tarragon cornish hens with a cognac cream sauce
loaded with chanterelles and grapes, and wild rice with grilled ramps (wild
garlicky leeks). Dinner was served close to midnight, but it was a party so
nobody cared.</p>
<p>We left that night
(technically, early the next morning) with full bellies, new cooking tips, and
nearly 5 hours of footage. I'm considering renaming the show "Cooking with
Nada Surf". </p>
</body>
</html>
Đây là trang web được hiển thị trên
trình duyệt, khi chúng ta chưa định kiểu (style, viết mã CSS) cho nó.

Thực hiện các bước sau để định kiểu cho
trang web:
– Sử dụng trình soạn thảo mã nguồn bất
kỳ để mở tập tin cooking.html. Trong phần tử head của tài liệu,
bạn sẽ thấy có sẵn một phần tử style, bạn sẽ nhập các chỉ dẫn
(rule) vào đây. Phần tử style được dùng để viết mã CSS (style sheet)
trong tài liệu HTML. Để bắt đầu, chúng ta sẽ thêm đoạn mã CSS đơn giản
sau vào tài liệu. Bạn gõ chính xác như những gì bạn thấy:
<style>
h1 {
color:
green;
}
p {
font-size:
large;
font-family:
sans-serif;
}
</style>
– Lưu tập tin và xem lại trên trình
duyệt. Bạn sẽ thấy một vài thay đổi (nếu trình duyệt của bạn đã sử dụng phông
chữ không chân (sans-serif), thì bạn chỉ thấy sự thay đổi về kích thước của
chữ). Nếu không có thay đổi gì, hãy quay lại mã nguồn và kiểm tra xem bạn đã
thêm các dấu ngoặc nhọn và dấu chấm phẩy hay chưa. Có thể bạn đã sơ ý bỏ sót
các ký tự này, nên việc định kiểu không có kết quả.
– Bây giờ chúng ta sẽ sửa mã CSS để
thấy việc viết các chỉ dẫn rất dễ dàng và quan sát những thay đổi trên giao
diện. Bạn thực hiện các việc sau.
Lưu ý quan trọng: bạn phải nhớ lưu tài
liệu sau khi thực hiện thay đổi, như vậy kết quả mới được hiển thị khi bạn tải
lại (hoặc làm mới - refresh) trang web trên trình duyệt.
– Định dạng phần tử h1 có màu gray, xem
kết quả trên trình duyệt. Sau đỏ chuyển nó thành màu blue, và cuối cùng để nó
có màu orange.
– Tương tự, thêm một chỉ dẫn CSS để
phần tử h2 có màu orange.
– Sử dụng khai báo này để định dạng
phần tử đoạn văn bản (p) cách lề trái (left margin) 100 pixel:
margin-left: 100px;
Lưu ý, bạn có thể thêm khai báo mới này
vào chỉ dẫn có sẵn của phần tử p.
– Tương tự, thêm khai báo để căn cho
tiêu đề h2 cách lề trái 100 pixel.
– Thêm đường biên dưới (border of
bottom), có độ dày 1 pixel cho phần tử h1 bằng khai báo sau:
border-bottom: 1px solid orange;
– Di chuyển hình ảnh sang phía phải
(căn phải), và cho phép văn bản bọc quanh nó bằng thuộc tính float. Dạng viết
rút gọn của thuộc tính margin cho biết, chỉ dẫn này sẽ không thêm khoảng trắng
ở phía trên và dưới của ảnh; thêm một khoảng trắng 12px phía trái và phía phải
của ảnh.
img {
float: right;
margin:
0 12px;
}
Sau khi thực hiện các
định dạng trên, trang web kết quả sẽ giống hình dưới đây.

Bài tập 1c. This is an HTML document in the file named cooking.html. You can get any picture to replace for salads.jpg (with dimensions are 300 x 200px).
[cooking.html]
<!doctype html>
<html>
<head>
<meta charset="UTF-8">
<title>Cooking with Nada Surf</title>
<style>
</style>
</head>
<body>
<h1>Cooking with Daniel from Nada Surf</h1>
<p>I had the pleasure of spending a
crisp, Spring day in Portsmouth, NH cooking and chatting with Daniel Lorca of
the band Nada Surf as he prepared a gourmet, sit-down dinner for 28 pals.</p>
<p>When I first invited Nada Surf to be
on the show, I was told that Daniel Lorca was the guy I wanted to talk to. Then
Daniel emailed his response: "i'm way into it, but i don't want to talk
about it, i wanna do it." After years of only having access to touring
bands between their sound check and set, I've been doing a lot of <em>talking</em> about cooking with rockstars. To actually cook with a band was a dream
come true.</p>
<h2>Six-hour Salad</h2>
<p><img src="salads.jpg" alt="Smoked tomato salads on plates"></p>
<p>Daniel prepared a salad of arugula,
smoked tomatoes, tomato jam, and grilled avocado (it's as good as it sounds!).
I jokingly called it "6-hour Salad" because that's how long he worked
on it. The fresh tomatoes were slowly smoked over woodchips in the grill, and
when they were softened, Daniel separated out the seeds which he reduced into a
smoky jam. The tomatoes were cut into strips to put on the salads. As the day
meandered, the avocados finally went on the grill after dark. I was on
flashlight duty while Daniel checked for the perfect grill marks.</p>
<p>I wrote up a streamlined adaptation
of his recipe that requires <em>much</em> less time and serves 6 people instead of <em>five</em>times that amount.</p>
<h2>The Main Course</h2>
<p>In addition to the smoky grilled
salad, Daniel served tarragon cornish hens with a cognac cream sauce loaded
with chanterelles and grapes, and wild rice with grilled ramps (wild garlicky
leeks). Dinner was served close to midnight, but it was a party so nobody
cared.</p>
<p>We left that night (technically,
early the next morning) with full bellies, new cooking tips, and nearly 5 hours
of footage. I'm considering renaming the show "Cooking with Nada
Surf". </p>
</body>
</html>
This is the web page displayed on the browser, when we don’t style yet.

Following
these steps to style for web page:
–
Open cooking.html in a text editor.
In the head of the document you will find that I have set up a style element
for you to type the rules into. The style element is used to embed a style
sheet in an HTML document. To begin, we’ll simply add the small style sheet
that we just looked at in this section. Type the following rules into the
document, just as you see them here:
<style>
h1 {
color: green;
}
p {
font-size:
large;
font-family:
sans-serif;
}
</style>
–
Save the file, and take a look at it in the browser. You should notice some
changes (if your browser already uses a sans-serif font, you may see only a
size change). If not, go back and check that you included both the opening and
closing curly bracket and semicolons. It’s easy to accidentally omit these
characters, causing the style sheet not to work.
–
Now we’ll edit the style sheet to see how easy it is to write rules and see the
effects of the changes. Here are a few things to try.
IMPORTANT:
Remember that you need to save the document after each change in order for the
changes to be visible when you reload it in the browser.
–
Make the h1 element “gray” and take a
look at it in the browser. Then make it “blue”. Finally, make it “orange”.
–
Add a new rule that makes the h2
elements orange as well.
–
Add a 100-pixel left margin to paragraph (p)
elements by using this declaration:
margin-left: 100px;
Remember
that you can add this new declaration to the existing rule for p elements.
–
Add a 100-pixel left margin to the h2
headings as well.
–
Add an orange, 1-pixel border to the bottom of the h1 element by using this declaration:
border-bottom: 1px solid orange;
–
Move the image to the right margin, and allow text to flow around it with the float property. The shorthand margin property shown in this rule adds
zero pixels of space on the top and bottom of the image and 12 pixels of space
on the left and right of the image.
img {
float: right;
margin: 0 12px;
}
When
you are done, the document should look something like the one shown in below
figure.
1.7 Câu hỏi ôn tập
Câu 1. CSS là viết tắt của các từ nào?
A. Code Style Sheets
B. Cascading Style Sheets
C. Cascading Style Source
D. Code Style Source
Câu 2. Quan sát đoạn mã p
{ color: red; font-size: 54px; }, theo thuật ngữ của CSS, phát biểu nào sau
đây không đúng?
A. p là bộ chọn
(selector)
B. Đoạn mã trên là một chỉ dẫn định dạng (style rule)
C. color là thuộc
tính (property)
D. Đoạn mã trên
là một khai báo (declaration)
Câu 3. Bạn có thể
viết mã CSS ở đâu? Phát biểu nào sau đây không đúng?
A. Viết ở trong
phần tử HTML, sử dụng thuộc tính style
B. Viết ở ngoài
tài liệu HTML, trong tập tin .css, sử
dụng phần tử link để liên kết
C. Viết ở trong
tài liệu HTML, sử dụng phần tử <script>
D. Viết ở trong
tài liệu HTML, sử dụng phần tử <style>
Câu 4. Theo kĩ
thuật xếp lớp (cascading) trong CSS, loại mã CSS nào có độ ưu tiên cao nhất ?
A. User agent style sheet
B. User style sheet
C. Author style sheet
D. Cả ba có độ ưu tiên như nhau
Câu 5. Khi áp dụng đoạn mã CSS sau, văn bản p có màu gì?
<style>
p { color: purple; }
p { color: green; }
p { color: gray; }
</style>
A. Tím
B. Xanh
C. Xám
D. Trắng
Câu 6. Trong các phương pháp để định chuẩn CSS (normalize
CSS, reset CSS), cách nào sau đây không đúng?
A. Dùng tập tin normalize.css
B. Dùng bộ mã reset CSS của Eric Meyer
C. Dùng bộ mã định chuẩn CSS của Bootstraps
D. Dùng lệnh Reset của CSS
Câu 7. In CSS, the term _____ is used when talking about
design and layout. The CSS ______ is essentially a box that wraps around every
HTML element. It consists of: margins, borders, padding, and the actual content.
A. border
B. cascading
C. box mode
D. box model
Câu 8. Trong CSS, đơn vị đo nào sau đây không phải là đơn vị
đo tương đối (relative)?
A. em
B. rem
C. %
D. px
-----